INTRODUCTION
TO ENDNOTE X
Contents
|
1.
Introduction |
|
2. Opening EndNote |
|
3. Setting up a New Reference
Library |
|
4. Displaying the Toolbars |
|
5. Inputting References
Manually |
|
6. Editing References in
EndNote |
|
7. Importing Downloaded
References with a Filter |
|
8. Connecting Directly to
Databases via the Internet |
|
9.
Direct Export from a Database to EndNote |
|
10. Copying References between
Libraries |
|
11. Searching an EndNote Library |
|
12. Sorting an EndNote Library |
|
13. Producing a Bibliography or Reading List |
|
14. Using EndNote with a Word Processor |
|
a. Formatting References
in an Author-Date Style |
|
b. Formatting References
in a Numbered Style |
This is an adaptation of a University of Queensland EndNote tutorial
that is available online at
http://www.library.uq.edu.au/endnote/introtutorialX/index.html. While the original tutorial works well for
an in home installation of EndNote, there must be a few changes for the use of
EndNote in the campus computer labs.
Areas that differ will be prefaced with Large Underlined
Italicized Comments
1. Introduction
EndNote is one of a number of Personal Reference Database programs that
are in use around the world today. The main functions of such programs are:
·
Maintenance of a database of references.
·
Downloading references from other databases.
·
Using the database to link to references in word-processed documents.
·
Generating a bibliography in the correct style for publication.
UC
Davis now has a campus-wide license allowing all current UC Davis students,
faculty and staff to install and use EndNote on computers at work and at
home. To download Endnote, go to: my.ucdavis.edu/software
To
learn more about EndNote at UCD you should go to the UCD Library EndNote page
at http://www.lib.ucdavis.edu/dept/instruc/research/endnote/index.php.
This guide aims to show you the basic skills required to get started
using version X of EndNote. It does not cover everything you will ever need to
know. The help screens in EndNote are very useful and they can be
accessed by clicking on the Help
option on the menu bar at the top of the screen or the Help button ![]() on the main toolbar.
on the main toolbar.
There is also a very detailed manual
for EndNote X. It is a .pdf file which
will be installed on your computer along with the other EndNote software. You
will need software such as Adobe Reader to read it. The manual is clearly
written and well indexed. The default location of the manual on your computer
is:
C:\Program Files\EndNote
X\EndNote.pdf
Have
a question about Endnote? The following resources can provide support and
information:
EndNote Email
Technical Support Request at http://www.endnote.com/support/entechform.asp
EndNote provides email and phone support for
questions related to using EndNote software.
IT Express at http://itexpress.ucdavis.edu/
Contact IT Express to receive support
downloading and installing EndNote on your computer.
University
Library EndNote Email Service Request at http://www.lib.ucdavis.edu/dept/instruc/research/endnote/ask.php
The UC Davis University Library provides
support for questions related to getting started using EndNote software with
library research resources. Please use the EndNote email service request form
and indicate your research subject area so the appropriate EndNote liaison can
contact you.
In this guide we use the Windows
operating system. EndNote X is
compatible with Windows 2000 and XP. EndNote is
also available for the Macintosh,
and the two versions are very similar. EndNote X is compatible with OSX (10.3.9
- 10.4.x).
Compatibility
with Earlier Versions
Beware:
EndNote X is compatible with EndNote 8 and 9, but it is not compatible with
EndNote 7 and earlier versions. If you use EndNote on more than one computer,
make sure that you have the same version of EndNote on all computers. If you
collaborate with colleagues, make sure that they are all using EndNote 8 or a later
version.
|
What is an "EndNote Library"? "Library" is the term used by
EndNote to describe a file where you have stored a database of references. A library can contain
up to 100,000 references. Multiple
libraries can be maintained, but generally there is no need to do this. All
references can be kept in the one library, and labelled or indexed to reflect
any particular subject interest. You
can set up a default library, which will open automatically when you open
EndNote. To do this, select: Edit>Preferences>Libraries Once
you have set up a default library, you will no longer see the introductory
dialogue box. |
2. Opening EndNote
This is the first of the differences between home
and the labs.
If you are in the labs, you will need to go to Start->All
Programs->Class Software->EndNote->EndNote Program. If you are at home, then go to
Start->Programs->EndNote->EndNote Program, or locate the EndNote
Program icon on your Start menu or desktop. In either case, you should see the dialogue box in Figure 1.
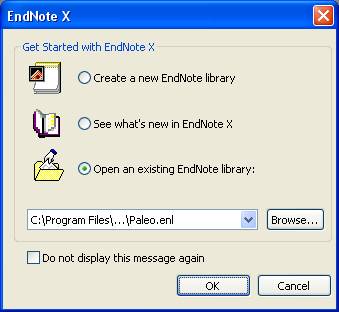
Figure 1: Initial Dialogue
Box
3. Setting Up a New Reference Library
Check the Create a new EndNote library option and click on the OK
button.
You will see the following dialogue box (Figure 2), with Untitled.enl
as the name of the new library.
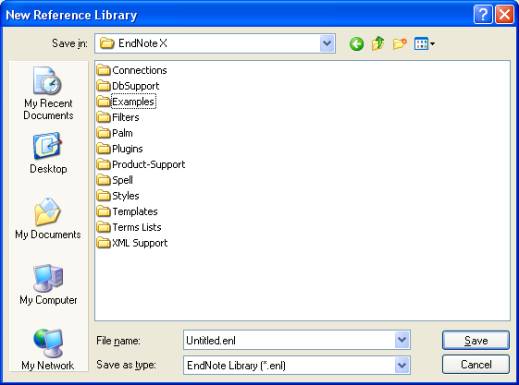
Figure 2: New Library
Dialogue Box
Click on the Desktop icon, to save the library on the Desktop, then in
the File name box, type project for the name for your
library.
Click on Save. You should
see Figure 3:
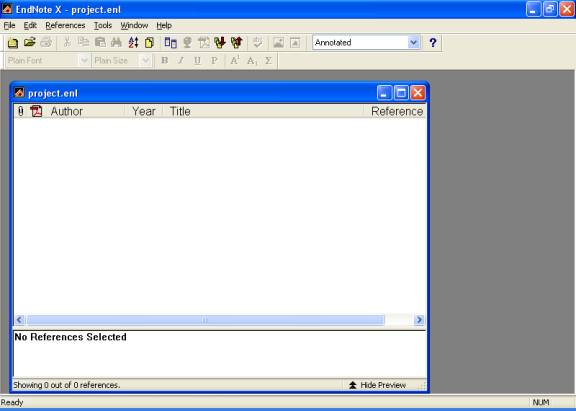
Figure 3: New Library Window
The Preview Pane at the bottom of the library window will show
you what your formatted references look like. To close the Preview Pane, click
on Hide Preview.
|
More
about EndNote libraries The
file extension .enl stands for EndNote Library. A library is just a file on your
computer, like any other file. It can be copied, renamed, deleted, moved to
another folder or compressed. It is very important to make
back-up copies of your library regularly and store them on another drive. An easy way to
back-up your library is to go to the File
option on the menu bar, and select Send
To>Compressed Library. When EndNote
creates the library, it will also create a .DATA folder which contains
various files connected with the library. When you copy the library, you
should also copy the .DATA folder. The
library window can be resized or maximised, like any other window. |
4. Displaying the Toolbars
Click on Tools on the menu bar and then on Show Toolbar.
Click on Main to display the main toolbar.
|
Do I have to use the toolbars? All the commands on the toolbars can be accessed from the menu bar at
the top of the screen, if you prefer to work that way. The toolbars give you
faster access to the most common commands. In this guide, we will use the toolbars. The Text Style Toolbar is not used very frequently, unless your
references contain text which must always appear in italics (e.g. a species
name) or with subscripts (e.g. a chemical formula). The CWYW/Add-in toolbar contains commands which can also be accessed
in Microsoft Word. |
5. Inputting References Manually
Click on the New Reference button ![]() on the main toolbar. You should now see Figure 4:
on the main toolbar. You should now see Figure 4:
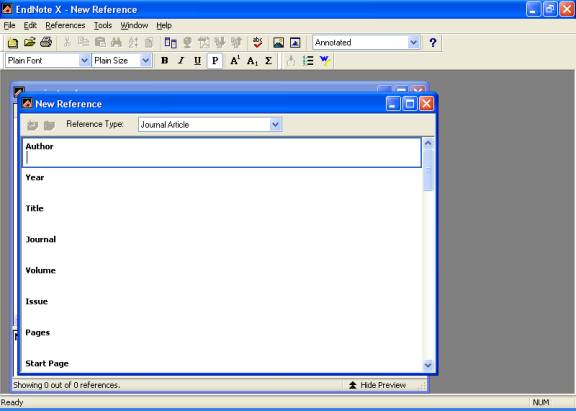
Figure 4: New Reference
Window
Note that Journal Article is
the default Reference Type. Click on
the arrow at the right of the Reference Type box to see the other reference
types (e.g. Book, Conference Proceedings, Map, Web Page, etc.)
With Journal Article as the
option in the Reference Type box, input the details for the article in Figure
5. Use the Tab key to go from one
field to the next, or click in the next field with the mouse.
When you have finished typing the data for your reference, it should
look something like Figure 5:
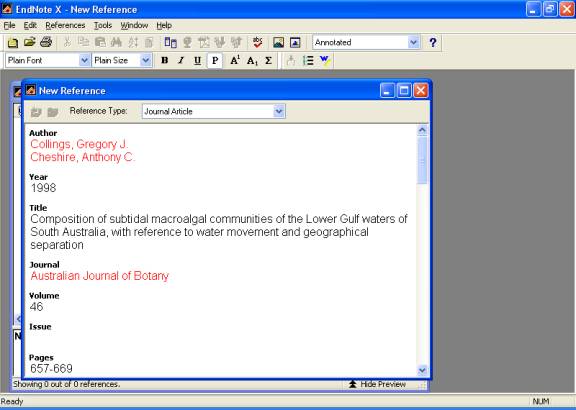
Figure 5: Journal Article
Reference
Close the reference by clicking on the X button in the top
right-hand corner of the New Reference window. Closing also saves the reference.
Practice inputting a reference for a book using the information
from Figure 6.
Remember to select the appropriate Reference
Type, and then input the data.
A reference for an edited book should look something like Figure 6:
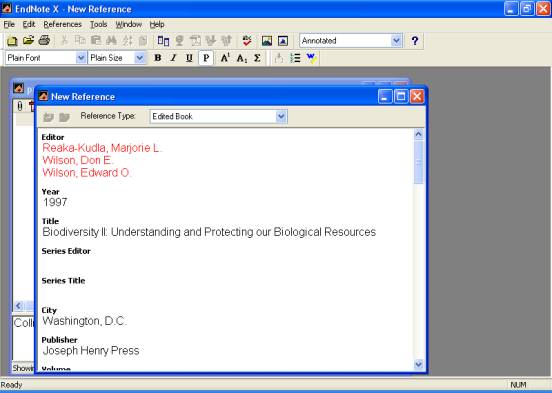
Figure 6: Edited Book
Reference
Close the reference.
|
"Garbage In, Garbage Out" Later you will learn about the EndNote output styles. These convert
the data in your library into formatted references. The output styles can
only format your data correctly if you have entered the data correctly in
your library. Here are some important points to remember when entering data: ·
If there is more than one author,
each author must be entered on a separate
line. ·
Corporate
authors must be entered with a comma at the end, e.g. Queensland Health, ·
Just
add the basic data, in the default EndNote font. The output style will change
this to bold or italics (if necessary) and add extra text such as
"vol." or "Ed." (if required by the style). ·
Fields
such as Keywords, Abstract, Notes are for your use. These fields can each
store up to sixteen pages of text. ·
Use
the URL field to link to an electronic version of the document on the web. ·
Use the
Link to PDF field to link to a PDF version of the document stored on your own
computer. ·
If
you use abbreviated journal titles in your publications, you can set up a
term list to store the abbreviations. There is more information in the manual
and on the UQ Library EndNote website. |
6. Editing References in EndNote
In the library window, double-click on one of the references that you
have entered. This will open it for editing.
You can change any of the details. Add some text to the Notes field of the Biodiversity book now.
Close the reference when you have finished editing and this will save
the changes.
If you want to delete a reference from your library, click on it once
in the library window to select it, and then go to the References option on the menu bar, and select Delete References. Do not
delete either of the examples!
7. Importing Downloaded References with a Filter
|
What is a "filter"? A filter is a piece of software that will take a file of references
which have been downloaded from a database and convert them into references
in your EndNote library. The file of references must be in plain text (*.txt) and must be
split up into labelled fields, something like this:
TI:
New developments in instructional software SO:
Journal of Educational Technology, vol. 3 (2001): 305-318 A filter is specific to a particular database (e.g. Medline,
Psycinfo). When the database is marketed by more than one vendor, separate
filters will be required for each vendor's version of the database (e.g.
Medline from Ovid, Medline from SilverPlatter, Medline from CSA). |
Here is another difference between the labs and home. You cannot save new filters in the labs!
Use your web browser to display the UCD Library EndNote Windows filters
page at:
http://www.lib.ucdavis.edu/dept/instruc/research/endnote/filters-win.php
If you are at home, browse through the list to find the Expanded
Academic ASAP database, and follow the instructions to install its filter in
EndNote. Save it in your EndNote
filters folder. The default location of the filters folder is C:\Program
Files\EndNote X\Filters.
If you are in the labs, just browse through the list to find PsychINFO
[CSA]. Since EndNote already has a
filter for PsychINFO [CSA], you should not download it.
In either case, leave the browser open to the instructions so that you
read them later.
Open another web browser to display the UCD Library Database list at:
http://www.lib.ucdavis.edu/ul/research/databases/
If you are at home, then open the Expanded Academic ASAP
database.
If you are in the labs, then open the PsychINFO [via CSA
Illumina] database.
In either case, perform a search and select two useful
references. After finishing your
search, follow the instructions from the Filters page to download the
references in the correct format for import to EndNote.
If you are in the labs, then skip to page 10. If you are at home, please continue from here.
For Expanded Academic database, the instructions are:
“Citations from Expanded Academic can be emailed only, not downloaded.
After you have done your search, check boxes of citations you want to put in
your EndNote library; remember that checking Mark All at the
upper left of the window will mark only the citations in the present screen,
and a maximum of fifty citations may be checked per search. Once you have
finished marking citations, click on Marked Items at the top
center. Then choose E-mail. In the next window, under E-mail
Format, click the radio buttons for Plain Text and Citation.
Under Bibliographic Citation Format, click the radio button
that says Plain Text with Bibliographic Tags (Z39.80). Once
you have received your email (which may take several minutes to arrive), and
saved your message, open EndNote, go to File, then Import,
then Choose File ... and go to where on your hard drive you
saved your email result. Click on Filter Options, choose Other
Filters ... and scroll through the list of filters to Expanded
Academic. Select it, and click on Import.”
Return to EndNote, and make sure that your library is open.
Click on the Import Button ![]() on the main toolbar. You should see a
dialogue box that looks like Figure 7:
on the main toolbar. You should see a
dialogue box that looks like Figure 7:

Figure 7: Import Dialogue
Box
Now click on the Choose File
button. Locate and highlight the file of references that you downloaded. Click
on the Open button to select the file. This will return you to the
previous dialogue box.
In the box labelled Import
Option, click on the down arrow to see some of the standard import options.
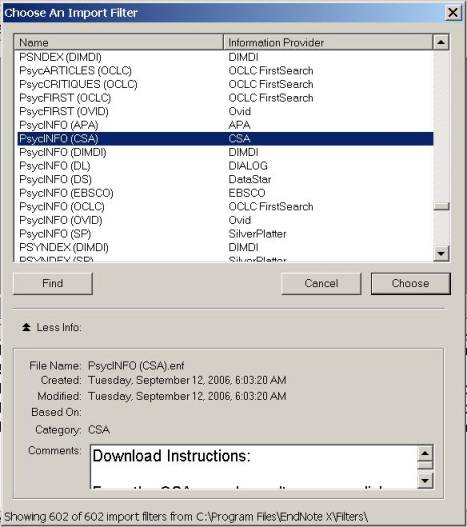
Then click on Other Filters to open the list of filters (Figure 8):
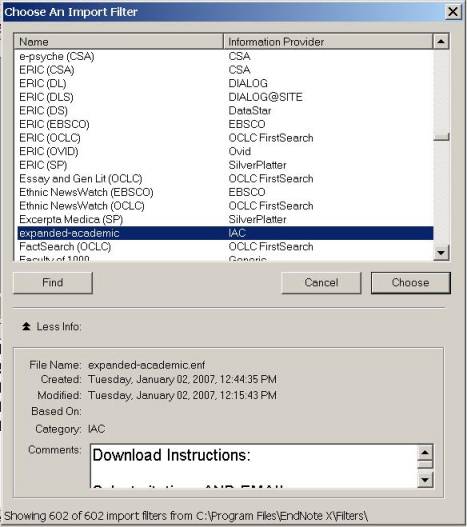
Figure 8: Filters List
Browse down the list of databases until you find the expanded-academic
filter. Highlight the filter and
click on the Choose button. This will return you to the previous
dialogue box.
Next, in the Duplicates box,
select Import into Duplicates Library.
In the Text Translation box, the default option Unicode
(UTF-8) is appropriate in most cases. The dialogue box should now look
something like Figure 9:

Figure 9: Import Dialogue
Box
Click on the Import button
and the references should be imported. In the library window you will see only
the references which you have just imported. To see all references in your
library, click on References on the
menu bar, then select Show All
References. Since you are at home,
please skip to page 12.
Students in a lab should continue from here on.
After creating your “Marked List” of references, you should follow the directions downloading
for the PsychINFO(CSA) database from the filters web page. They are:
- In the database: Select
references.
- Click on Print/Save/Email
Records button.
- Under Show
click on the pulldown menu and choose Full record.
- Choose appropriate
format (PC) and click on Save.
- Save file to local disk
as a text file.
For ease, save the file to the Desktop.
Return to EndNote, and make sure that your library is open.
Click on the Import Button ![]() on the main toolbar. You should see a
dialogue box that looks like Figure 10:
on the main toolbar. You should see a
dialogue box that looks like Figure 10:
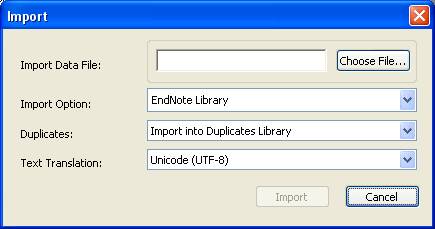
Figure 10: Import Dialogue
Box
Now click on the Choose File
button. Locate and highlight the file of references that you downloaded. Click
on the Open button to select the file. This will return you to the
previous dialogue box.
In the box labelled Import
Option, click on the down arrow to see some of the standard import options.
Then click on Other Filters to open the list of filters (Figure 11):
Figure
11: Filters List
Browse down the list of databases until you find the PsycINFO(CSA)
filter. Highlight the filter and
click on the Choose button. This will return you to the previous
dialogue box.
Next, in the Duplicates box,
select Import into Duplicates Library.
In the Text Translation box, the default option Unicode
(UTF-8) is appropriate in most cases. The dialogue box should now look
something like Figure 12:

Click on the Import button
and the references should be imported. In the library window you will see only
the references which you have just imported. To see all references in your
library, click on References on the
menu bar, then select Show All
References. Since you are at home,
please skip to page 12.
All students should continue from here.
|
More on filtering references After filtering, only the references which you have just imported
will be visible in the library window. To see all the references in the
EndNote library, click on References
on the menu bar, then on Show All
References. No
filter is perfect, and all references should be checked after import. For
this reason, it is often better to import references into a temporary
library, and leave them there until they can be checked against the file of
downloaded references and amended. They can then be transferred to the
permanent library. |
8. Connecting Directly to Databases via the Internet
Click on the Connect button ![]() on the main toolbar. A list of available
connection files will appear (Figure 13):
on the main toolbar. A list of available
connection files will appear (Figure 13):
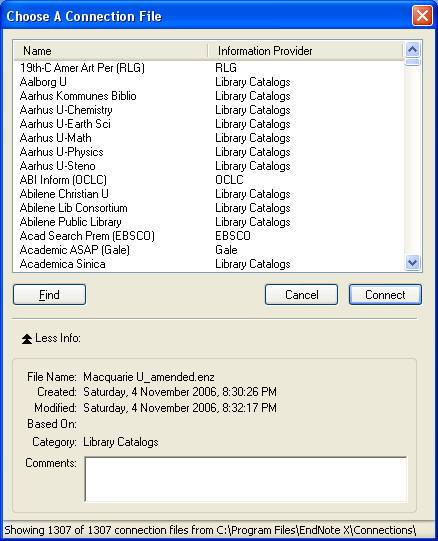
Figure 13: Connection Files
List
Browse down the list of databases until you find the U of California
connection file this will allow you to access the Melvyl catalog .
Highlight the file, then click the Connect button, and EndNote
will use your Internet connection to access the database. You must have a
connection to the Internet currently open in order to use the EndNote Connect
function.
You may be asked to enter a user ID and password. If so,
enter these now.
When the connection to the database is successfully established,
EndNote opens a Remote Search window and (in the background) a
Retrieved References window. Your screen should look something like Figure 14.

Figure 14: The Connection
File Search Window
Enter a search term in the first search box.
If required, you can select the appropriate Boolean operator to the right of
that box, and enter a further term in the second search box.
You can display more search boxes by clicking
on the Add Field button.
Your screen should now look something like Figure 15:

Figure 15: Constructing a Search
with a Connection File
Now
click on the Search button, and you will see a dialogue box stating the
number of references which match your search (Figure 16):
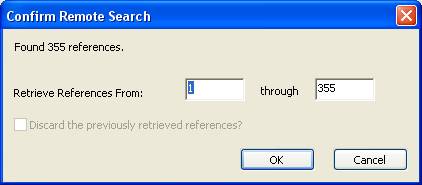
Figure 16: "Confirm
Remote Search" Dialogue Box
To retrieve the first ten references, change the
figure in the second box to 10. Then click on the OK button and the references will be displayed in the Retrieved References
window, which acts as a temporary EndNote library (Figure 17).
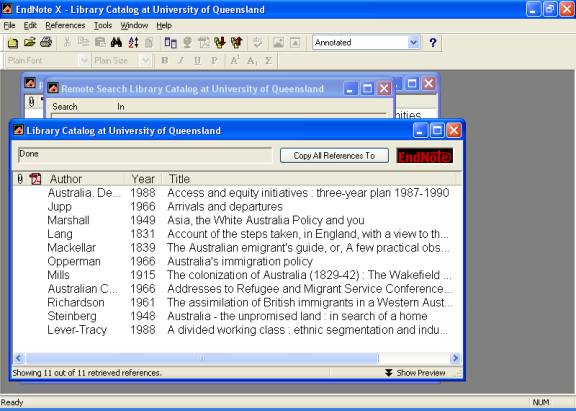
Figure 17: The Retrieved
References Window
You can double-click on any of these references to open them and view
the full details.
Select the references that you would like to transfer to your library
by holding down the Ctrl key and
clicking on the required references.
Click on the Copy # References
To button to determine where the references will be saved. EndNote will ask
you which Library you want to save the references to (e.g. New Library, Choose Library
or any library which is already open).
If you wish to search the database again, click on Window on the
top menu bar, and when the drop-down menu appears, click on the name of the database that you were
searching. This will display the retrieved references window again. Now
click on the Search button on the main toolbar ![]() to display the search dialogue box again.
to display the search dialogue box again.
When you have finished searching, close the Search window by
clicking on the X button in the top right-hand corner. Close the Retrieved
References window in the same way. You will be asked to confirm that you
wish to discard the retrieved references. Click on the OK button,
because you have already transferred the references which you want into your
EndNote library.
|
More on connection files … In addition to the connection files which you can download from the UQ Library EndNote website, you can use many of the connection files supplied with the EndNote software. Databases such as PubMed and library catalogues are freely accessible without a password. From your home computer, with a dial-up connection to the UQ Network,
you will only be able to use connection files for the SilverPlatter
(Webspirs) databases, PubMed, Web of Science and the UQ Library catalogue. If you use a commercial internet
service provider, you will probably be able to use a wider range of
connection files. However some connection files can only be used from
computers on campus. Boolean operators are processed strictly in the order of input. So if
you are looking for material on "Forestry in Indonesia and
Malaysia", you must construct your search as "Indonesia OR Malaysia
AND forestry". If you input the search "forestry AND Indonesia OR
Malaysia" you will retrieve every record on the database which includes
the term "Malaysia". As with filters, the connection files do not always import data
accurately. All references should be checked after import. |
9. Direct Export from a Database to EndNote
|
What is "direct export"? When you are searching some databases via the web, you will find that
they allow you to select records and then send them directly to your EndNote
library. The database locates your EndNote software and asks you to choose
the EndNote library. It will then transfer the records to your library. This
is called "direct export". With some databases, such as Web of Science, this feature works very
well. However with certain databases you will find that the records do not
import accurately. In such cases, you may find it better to download the
records and use a filter to import them, or to search the database from
EndNote using a connection file. |
Use your web browser to display the UCD Library Database list at:
http://www.lib.ucdavis.edu/ul/research/databases
Locate the entry for Web of Science and click on it. Note that,
despite the name of this database, it contains references in all disciplines.
If you are not familiar with this database, use the Quick Search box to
perform a simple search.
When your results are displayed, click in the boxes beside at least two
of the references to "mark" those references. Now click on the Add to Marked List button. At the top
of the screen, you will now see a button labelled Marked List.
Continue searching and marking at least five records. When you have
finished, click on the Marked List
button.
You will now see a new screen. At the bottom of the screen are your
marked records, but above them is a panel headed Output Options. At Step
1, you can select the amount of data that you wish to export to EndNote. We
recommend that you at least check the abstract and keywords
options. Your screen should look something like Figure 18:
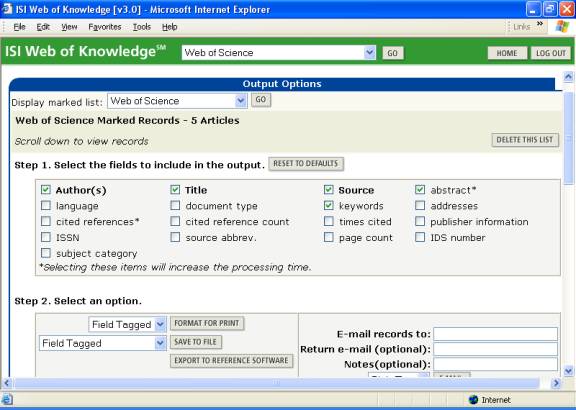
Figure 18: Web of Science
Output Options
At Step 2, all that you have to do is click on the Export to
Reference Software button. After a short delay, your EndNote software will
open. You will be asked to Select a Reference Library. Locate the Project
library that we have been using, highlight it and click on the Open
button. The references will now be imported into that library.
10. Copying References between Libraries
If you have more than one library, moving references from one library
to another is easy.
Your library should already be open. We will now open another library
called Paleo (a large library containing references on palaeontology),
which is supplied with the EndNote software. The default location is:
C:\Program Files\EndNote X\Examples\Paleo.enl
Click on the Open Library button ![]() on the main toolbar.
This will bring up a dialogue box where you can select the Paleo library
(Figure 19):
on the main toolbar.
This will bring up a dialogue box where you can select the Paleo library
(Figure 19):
Figure 19: The "Select
a Reference Library" Dialogue Box
Highlight the Paleo file and click on the Open button to
open the Paleo library.
You now have two libraries open. The easiest way to copy references is
to tile the libraries, so that they appear side by side. To do this, click on Window
on the menu bar, and then click on Tile. Your screen should look like Figure
20:
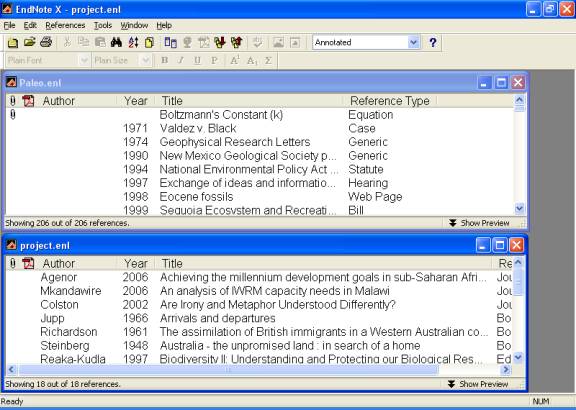
Figure 20: Two Libraries in
Tile Format
To copy a reference from the Paleo library into your library,
click on the reference to highlight it. Then click on it again and drag and
drop it into your library. Copy the
Cosgrove 1947 Caves of the Upper Gila to your Project.enl. To ease your search for Cosgrove, you can
click on category headings to sort according them. A year sort works quite well for this particular search.
You can select a group of references and drag and drop them in the same
way. Remember that to select a group of adjacent references you must
hold down the Shift key, but to select references which are not
adjacent, you must hold down the Ctrl key.
You can close a library by clicking on the X button in the top
right-hand corner of the library window.
11. Searching an EndNote Library
EndNote provides a sophisticated search function, which allows you to
locate specific references or groups of references in your library. We will
practice this, using the Paleo library.
To begin a search, click on the Search button ![]() on the main toolbar,
and you will see the search dialogue box that we have already used when we
practiced using connection files. Now we are using it to search an EndNote
library.
on the main toolbar,
and you will see the search dialogue box that we have already used when we
practiced using connection files. Now we are using it to search an EndNote
library.
Type the word sediment in the first search box. Leave the
default options as they are (Figure 21).
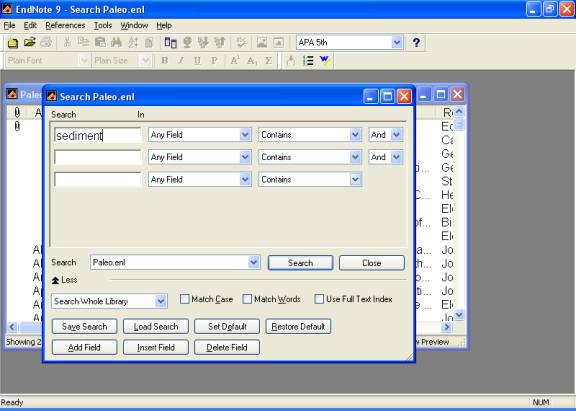
Figure 21: Searching an
EndNote Library
Note that we have not checked the Match Words box. This means
that we are searching for the string of letters sediment and not just
for the word sediment.
Click on the Search button,
and you should see Figure 22, with
22 references. Note that these include references containing words like sedimentary,
sedimentology, synsedimentary. This is because we did not check
the Match Words option in the search box.
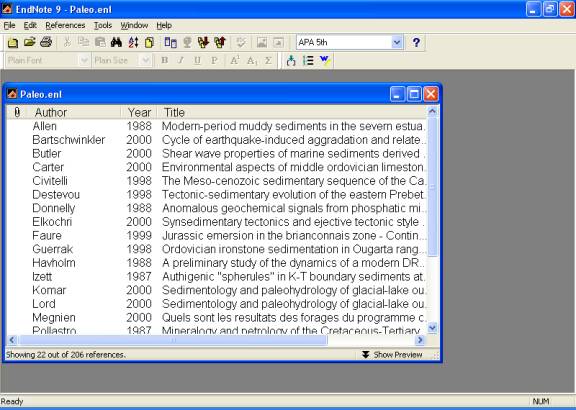
Figure 22: Results from
Searching an EndNote Library
Let’s do a slightly more complicated search. Assume we wish to find all
references by the author Jones that were published after 1990. This
means that we wish to find references which have jones in the Author
field, and a number greater than 1990 in the Year field.
Click on the Search button
on the main toolbar again to display the search dialogue box. In the first row,
type jones as the search term in the
first box, then in the box to the right, click on the arrow to select the Author field. At the end of that row,
make sure that And is selected as
the Boolean operator. Go down to the next row and type 1990 as the search term in the first box, then in the box to the
right, click on the arrow to select the Year
field. Now click on the second arrow
to select Is greater than. The
screen should look like Figure 23:
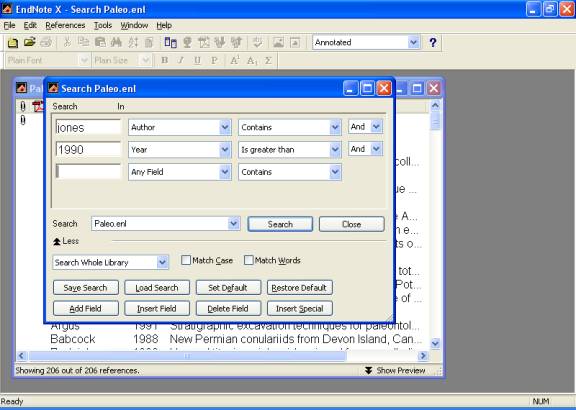
Figure 23: Constructing a
Boolean Search of an EndNote Library
Click on the Search button
and you should retrieve two references. Neither of these references has Jones
as the first author, but if you open the references, you will find that they
both have Jones as a collaborating author.
Click on the Search button ![]() on the main toolbar
to display the search dialogue box again. Close the dialogue box by clicking on
the X button in the top right-hand corner.
on the main toolbar
to display the search dialogue box again. Close the dialogue box by clicking on
the X button in the top right-hand corner.
12. Sorting an EndNote Library
When you open a library, it automatically sorts itself alphabetically
by author. However you can sort your references on any of the fields in the
record, e.g. author, title, year, label.
We will sort the Paleo library by year of publication, with the
most recent references appearing first.
Click on References on the menu bar, and then click on Show
All References.
Click on the Sort Library button ![]() on the main toolbar.
The following screen (Figure 24)
will appear:
on the main toolbar.
The following screen (Figure 24)
will appear:

Figure 24: The "Sort
Options" Dialogue Box
In the first box, click on the arrow to select Year.
At the end of the box is a button which indicates whether you wish to
sort items from smallest to largest
![]() or from largest to smallest
or from largest to smallest ![]() . Click on this button to change it to sort from largest to
smallest, i.e. from most recent year to earliest year.
. Click on this button to change it to sort from largest to
smallest, i.e. from most recent year to earliest year.
In the second box, click on the arrow to select Author and leave
the default setting to sort from smallest to largest, i.e. from A to Z. This
means that after EndNote has sorted the references by year, it will sort them
within each year alphabetically by author.
The box should now look like Figure
25:
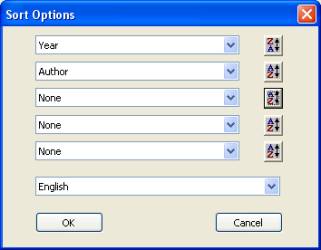
Figure 25: Specifying the
Sort Options
Click on the OK button and
the references in the library will now be sorted chronologically, with the most
recent references first.
13. Producing a Bibliography or
Reading List
|
What is an output style? An EndNote output style (often just referred to as a
"style") is a piece of software that will convert the data in your
library into formatted references that correspond to the bibliographical
styles used by journal publishers or specified in style manuals such as the
Chicago Manual of Style. Hundreds of output styles are supplied with the software, so there is
a good chance that you will find one suitable for your needs. If not, EndNote
allows you to create your own output styles or edit an existing output style. |
We will
now look at using EndNote to produce bibliographies. To begin, we consider how
to use the references in your library to generate a reading list for students,
or a list of references for a colleague, or perhaps a list of your own
publications for your CV.
While holding down the Ctrl key, select about
five references from your library.
Click on References in the menu bar and then click on Show
Selected References. You should now be able
to see only those references which you selected. At this point, you could sort
the references if you wished them to appear in your bibliography in a different
order.
Now you have to decide on the bibliographic
style that you wish to use for your references. Go to the style menu ![]() on the main toolbar and click on the arrow.
You will see a list of the four basic EndNote styles. Click on Select Another Style to open the complete list of output styles
which are supplied with the EndNote software (Figure 26):
on the main toolbar and click on the arrow.
You will see a list of the four basic EndNote styles. Click on Select Another Style to open the complete list of output styles
which are supplied with the EndNote software (Figure 26):
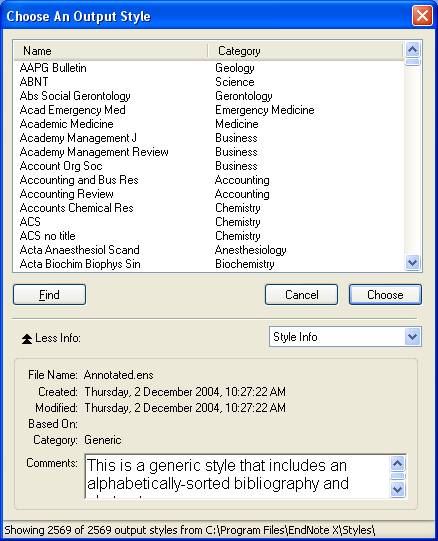
Figure 26: Output Styles
List
Find that APA
5th style, and then click on it to highlight it. Click on the Choose button to select
that style.
This will return you to the library window,
with only your selected references showing. To generate a bibliography from
these references, using the style that you have just selected, click on the
Export button ![]() on
the main toolbar.
on
the main toolbar.
You will now see a dialogue box. Save the exported
references to a convenient folder. In the Save
as type box, click on the arrow to select Rich Text Format. Name the file ProjectBib.rtf
Click on the Save button. To view the
bibliography, open your word processor and then open the file which you have
just saved.
14. Using EndNote with a Word Processor
///////////////////////////////////////////////////////////////////////////////////////////////////////////////////////////////////////////////////////
You will now practice using Cite While You Write by adding some
references to a sample paper. You will
find a word document called manuscript.doc in the ECS15 class folder that is
located at on the server at G:\. You
can access it by double-clicking on My Computer and then choosing class.dir
on ... (G:), and then opening the ECS15 folder. Copy the file to the Desktop, and then double click it to open it
in Word. If you are at home, the file
is available from the ECS 15 website at MyUCDavis (look in the Lab Exercise 1
folder) or at http://nob.cs.ucdavis.edu/classes/ecs015-2007-02/manuscript.doc
///////////////////////////////////////////////////////////////////////////////////////////////////////////////////////////////////////////////////////
|
Is my word processor compatible with EndNote X? For Windows
users, EndNote X is compatible with Word 2000, Word XP and Word 2003, using
Cite While You Write (as explained below). If you are using an earlier
version of Word, or another word processor (such as WordPerfect), you must
save your documents in Rich Text Format and use the RTF Document Scan
function (as explained in the manual). On the
Macintosh, EndNote X is compatible with Word X and Word 2004, using Cite
While You Write (as explained below). If you are using an earlier version of
Word, or another word processor, you must save your documents in Rich Text
Format and use the RTF Document Scan function (as explained in the manual). |
We have just seen how to use EndNote to
create an independent bibliography, but EndNote can also work in conjunction
with your word processor, so that you can insert references as you type a
document, and automatically generate the bibliography.
Last difference between home and the labs.
If you are in the labs, to start Microsoft Word with EndNote you must
go to: Start->All Programs->Class
Software-> EndNote->Run EndNote in Word.com. If you have a compatible version of Microsoft Word (Windows or
Macintosh) installed on your computer at home, when you install the EndNote
software two extra files will be inserted into your word processing software.
In either case, these are the Cite While You Write tool. Open
Word and then click on Tools on the menu bar. Click on the EndNote X
submenu, and you should see some additional commands relating to EndNote (Figure
27):

Figure 27: The EndNote Tools
Menu in Microsoft Word
These commands can also be accessed using a special EndNote X toolbar.
To display the toolbar, click on View on the menu bar, then select Toolbars,
and click on EndNote X to display the EndNote toolbar. It should look
like Figure 28:
![]()
Figure 28: The EndNote
Toolbar in Microsoft Word
If you position your mouse over any of the buttons on the toolbar, a
text box will appear showing the name of the button. The toolbar can be dragged
to any position in the window. In this guide, we shall be using the toolbar,
but you can use the commands on the Tools menu, if you prefer.
a. Formatting References in an Author-Date Style
|
What is an "author-date style"? The Harvard Style is the best-known author-date style, but there are
many variations. In the text of the paper, the reference is cited in an
abbreviated form similar to " … (Smith, 1993)". In the list of references at the end of
the paper, references are given in full and listed alphabetically by author. |
Open your Word document.
First, we need to decide which style we wish to use. Click on the Go
to EndNote button ![]() on the toolbar.
on the toolbar.
In EndNote, go to the style menu ![]() on the main EndNote toolbar and click on the
arrow. Click on Select Another
Style to open the complete list of
styles.
on the main EndNote toolbar and click on the
arrow. Click on Select Another
Style to open the complete list of
styles.
Browse through the list to find the APA
5th style and choose it. This is the output style corresponding to the
fifth edition of the American Psychological Association's Publication Manual.
It is a commonly used author-date style.
Return to Word, click on the Format Bibliography button ![]() on the EndNote toolbar, and you should see
the dialogue box shown in Figure 29.
Make sure that the box labelled With output style is showing APA 5th.
on the EndNote toolbar, and you should see
the dialogue box shown in Figure 29.
Make sure that the box labelled With output style is showing APA 5th.

Figure
29: The "Format Bibliography" Dialogue Box
Click on the OK button to
confirm the output style for this document.
Go to the end of the first sentence, where we will insert our first
reference, and insert a space before the full stop.
Click on the Find Citations button ![]() on the toolbar. This opens a search window.
on the toolbar. This opens a search window.
Think of a reference which you wish to cite from your library. Enter
the author’s name in the search box, and click on the Search button.
EndNote will display the matching references (Figure 30):
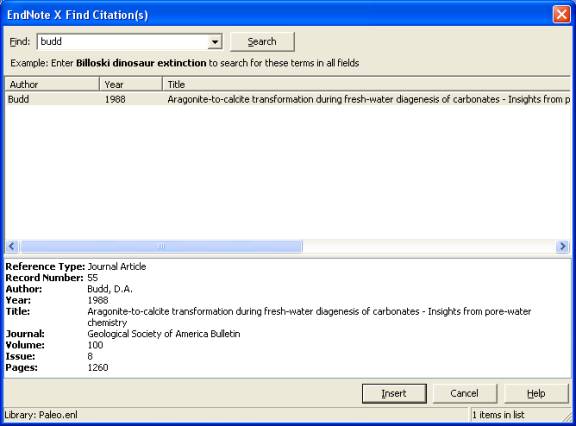
Figure 30: The "Insert
Citations" Search Window
Click on the Insert button, and this reference will be inserted
into your document.
EndNote will instantly format the citation in the text and produce a
list of references at the end of the document in the APA style. Your document
might now look something like this (Figure 31):
Recent
Developments in Personal Bibliographic Software: a Critical Review
By J.W. Bloggs Since the 1980s, there have been a variety of software products on
the market which can be classified under the general heading of Personal
Bibliographic Software (Budd, 1988).
All of these products perform the same two basic functions: they allow
the user to maintain a database of bibliographic references and they permit
the generation of a bibliography containing some or all of those references.
Among others, Glaser has provided a
good summary of the products currently on offer. Substantial developments have taken place in the functionality of
personal bibliographic software. Today it is not difficult to find a product
that can automatically import references from a database and format both
in-text citations and a list of references in a wide variety of styles. References Budd, D. A.
(1988). Aragonite-to-calcite transformation during fresh-water diagenesis of
carbonates - Insights from pore-water chemistry. Geological Society of America Bulletin, 100(8), 1260. |
Figure 31: Manuscript with
Reference in APA 5th Style
We shall now add some more references to this paper.
At the end of the second sentence in your Word document, insert a space
before the full stop and again click on the Find Citations button ![]() .
Search for another reference, using the author's name or some words from the
title. Select and highlight a reference, and click on the Insert button.
.
Search for another reference, using the author's name or some words from the
title. Select and highlight a reference, and click on the Insert button.
Continue adding references to your
document in this manner. As an alternative to using the Find Citations command,
you can click on the Go to EndNote button ![]() on the toolbar and select references directly
from your library. Highlight a reference in the library window and return to
Word. Then use the
Insert Citation button
on the toolbar and select references directly
from your library. Highlight a reference in the library window and return to
Word. Then use the
Insert Citation button ![]() on the EndNote toolbar.
on the EndNote toolbar.
Save the changes that you have made to your paper.
b. Formatting References in a Numbered Style
|
What is a "numbered style"? In a numbered style, references are indicated by a number in the
text. The number is often printed as a superscript. At the end of the paper,
the references are given in full and arranged by the numbers which they have
been assigned. Do not confuse a numbered style with a footnote (or endnote) style. With a footnote/endnote style, it is the footnotes/endnotes which are numbered. The references are then inserted into the footnotes/endnotes, along with other text. |
Using the paper that you have already formatted, we will change the
style to a numbered style. This situation could arise if you decided to
submit the article to a different journal.
Click on the Go to EndNote button ![]() on the toolbar. In the style menu on the main
toolbar in EndNote, select another style. Choose the Nature style.
on the toolbar. In the style menu on the main
toolbar in EndNote, select another style. Choose the Nature style.
Return to Word. Click on the Format Bibliography button ![]() on the toolbar, and you should see this
dialogue box (Figure 32). Make sure that the box labelled With output
style is showing Nature:
on the toolbar, and you should see this
dialogue box (Figure 32). Make sure that the box labelled With output
style is showing Nature:
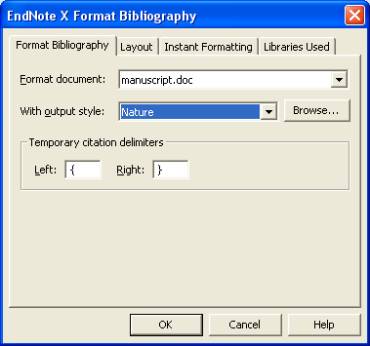
Figure 32: The "Format
Bibliography" Dialogue Box
Click on the OK button, and EndNote will reformat your document with the new style. It
might now look something like Figure 30.
Recent
Developments in Personal Bibliographic Software: a Critical Review
By J.W. Bloggs Since the 1980s, there have been a variety of software products on
the market which can be classified under the general heading of Personal
Bibliographic Software 1.
All of these products perform the same two basic functions: they allow
the user to maintain a database of bibliographic references and they permit
the generation of a bibliography containing some or all of those references 2.
Among others, Glaser has provided a
good summary of the products currently on offer. Substantial developments have taken place in the functionality of
personal bibliographic software 3. Today it is not difficult to
find a product that can automatically import references from a database and
format both in-text citations and a list of references in a wide variety of
styles. References 1 D.A. Budd, Geological Society of America Bulletin 100 (8), 1260 (1988). 2 S. Guerrak, Journal of African Earth Sciences and the Middle East 7 (3), 50 (1998). 3 D. S. Sepich, D. C. Myers, R. Short
et al., Genesis 27 (4), 159 (2000). |
Figure 30: Manuscript with
References in Nature Style
Now that your done creating Project.enl and manuscript.doc you should
store them in your MySpace. You get to
MySpace by selecting the "Connect to MySpace" icon on the
Desktop. After you have stored it in
MySpace, you should then go to MyUCDavis, and submit them to ECS 15. In MyUCDavis, you would go to
My Classes->ECS15, then Assignments and then the Drop Off of
Lab 1.
After submitting the two files, you are done. Don't forget to use the Start button to logout from the lab
computers!