A Step-By-Step Guide to Installing FreeBSD 5.4
Software you’ll need to download beforehand:
1- VMWare 1.0.4
a. This is the Windows Binary of VMWare 1.0.4. If you’re using another operating system, look for the binary to us on this site. Also, the instructions for installing VMWare below were created using Windows Vista.
2- FreeBSD 5.4 ISO: Disc 1, Disc 2
Installing VMWare: (On Windows)
1- Open the file “VMware-server-installer-1.0.4-56528.exe” to start the VMWare Server installation.
2- On the “Welcome to the installation wizard” screen, press next.
3- Agree to the terms, press next.
4- On Setup Type screen, choose “Complete” and press next.
a. If you get a screen saying Microsoft IIS is needed, simply press OK to continue: we won’t be needing this feature of VMWare.
5- Next, select the directory you wish to install VMWare to, and press Next.
6- Click Install to begin installation of VMWare.
7- The installation may take a little time, so grab a cup of coffee and relax.
a. You might get a Windows Security popup saying VMWare wants to install drivers whose authors can’t be verified by Microsoft: don’t worry, and just click on “Install this driver anyway” (or an equivalent option on Windows XP, or whichever flavor you’re using).
8- After installation, VMWare will prompt you for some Customer Information, and will require a serial number. Simply go to this site to get your free registration serial number and use that to proceed forward.
9- On the next screen, press Finish. You’re done!
Configuring VMWare:
1- Once VMWare is installed on your machine, open it using the Desktop icon it creates (“VMWare Server”).
2- On the first screen (“Select the VMWare host that you want to connect to”), select “Local host” and press OK.
3- In order to install FreeBSD, we will need to create a new Virtual Machine.
a. Press Ctrl-N to start the creation of a new Virtual Machine.
b. On the Welcome screen, press next.
c. On the “Select the Appropriate Configuration”, select “Typical” and press next.
d. On the next screen, select “Other” as your “Guest operating system” and select FreeBSD from the list below. Press next.

e. Select a name for your virtual machine and a path you wish to create it at.

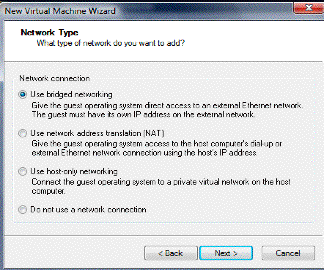
f. On the next screen, select “Use bridged networking” and press next.
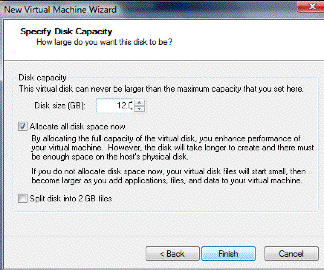
g. On the “Specify Disk Capacity” screen, change the size of the Virtual Machine to whatever you want to allocate for it (I allocate 12.0gb just so I have enough space allocated for unforeseen installation/usage on this Virtual Machine). Press Finish.
i. If you encounter problems during this step, they’re due to the fact that VM will try to create one file for your virtual machine of 12.0gb (some filesystems, such as Fat32, cannot support files larger than 4.0gb). In that case, check “Split disk into 2 GB files before proceeding.
h. Now for some additional configuration to get your VM going:
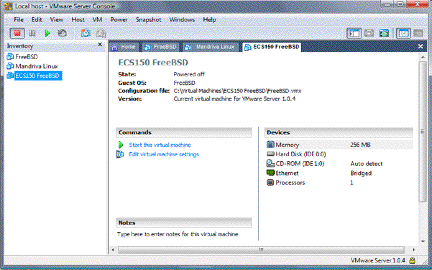
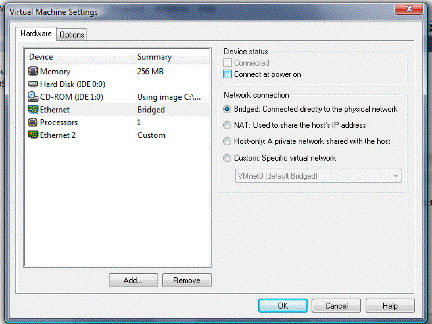
i. Right-click on ECS150 FreeBSD above, and click on Settings. Select CD-ROM as shown below, select “Use ISO Image” and browse to Disc1 of FreeBSD5.4 downloaded before.
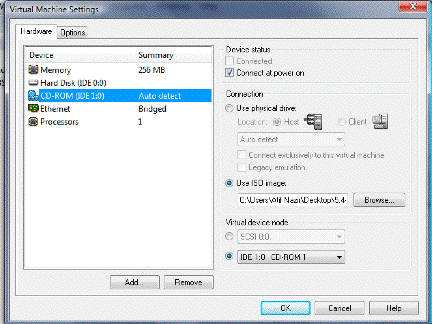
i. Next, click on “Add” above. This will open a “Welcome to the Add Hardware Wizard”. Press Next, select “Ethernet Adapter”, press next, selet “Custom: Specific Virtual Network” and select “VMnet8”. Press finish.
j. On the Virtual Machine Settings, select the Device “Ethernet” and uncheck “Connect at Power On”.
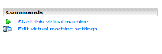
k. Press OK to return to the VMWare Server Console. Under commands on this screen, press “Start this virtual machine”.
Installing FreeBSD 5.4
We show a step-by-step installation here with the help screenshots taken during installation. Also, note that switching between FreeBSD emulation and the VMWare Server can be done by pressing “Ctrl-Alt” when you’re inside the FreeBSD emulation, and by click on the black FreeBSD emulation screen when you’re on your operating system.
1. The first important screen you’ll see will ask you to select an option for booting FreeBSD. Simply wait for this screen to go away.
2. Next, you will reach this screen:
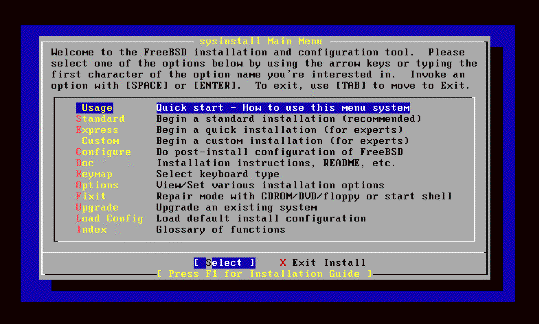
3. Select “Custom” from the list above, and press “Enter”, and you will reach the screen shown below:
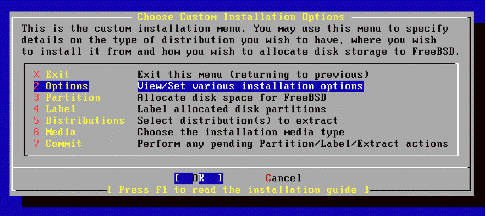
4. Select “Partition” from the list above, press A (“use Entire Disk”) and press Q. Next, on the screen titled “Install boot manager…”, select “Standard” (“install a Standard MBR”) and press Enter. You will return to the screen shown in step #3 above.
5. Now, select the “Label” option (shown in step #3 above), press Enter and you will reach the “FreeBSD Disklabel Editor”. Press C here, and you will get the following screen:
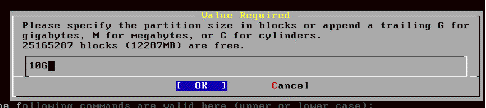 Remove whatever was in the field with the cursor, and type
10G (if you allocated 12gb to the virtual machine, 8gb if you allocated 10gb,
6gb if you allocated 8gb, and so on). Press Enter. Select FS on the next
screen, press Enter, type / and press Enter.
Remove whatever was in the field with the cursor, and type
10G (if you allocated 12gb to the virtual machine, 8gb if you allocated 10gb,
6gb if you allocated 8gb, and so on). Press Enter. Select FS on the next
screen, press Enter, type / and press Enter.

6. Next, press C again, press Enter, and select SWAP, press Enter. That’s it, you’re done allocating your disks for FreeBSD. Press Q to return to the menu shown in step #3.
7. Next, select Distributions from the menu shown in step #3, select “All” on the “Choose Distributions” screen, press Enter (“yes”) on the “User Confirmation Requested” screen, select Exit on the “Choose Distributions” screen, and press Enter. You will return to the menu from step#3 again.
8. On the menu from step#3, select Media, choose CD/DVD, and press Enter.
9. Next, from the menu from step#3, select “Commit” and press Enter. Press Enter again on the screen “User Confirmation Requested” and this will start the FreeBSD installation on the Virtual Machine.
10. After a few seconds of installation start, the screen will look something like this:
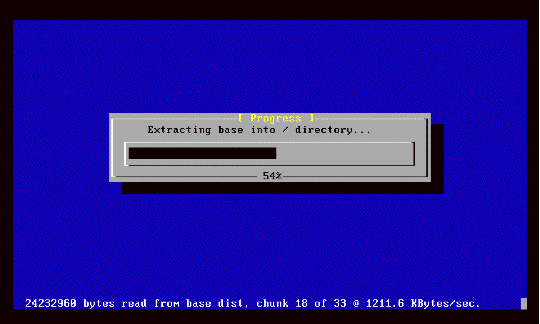
11.
Now we wait for the installation to complete. After the
installation, you will see the
following screen: (Select “Yes” and press Enter). This will lead you to the
screen shown below the next.
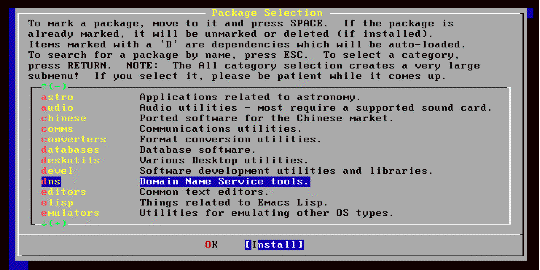
12. Select “Packages” and choose the packages you wish to install. Packages that you will need are: all editors and all development packages (devel).
13. When done selecting the packages, select “Install” by pressing Tab and press Enter.
14. Select OK on the next screen and press Enter.
15. If your are next asked for Disc#1 or Disc#2 of FreeBSD 5.4 (shown below), select Yes and press Enter.


a. At this point (when shown the above screen), right-click on “ECS150 FreeBSD” in the Inventory to the left of the black FreeBSD screen, go to CD-ROM, and browse to the Disc#x ISO (where x = { 1 , 2 }). When done selecting this ISO, press OK. Go back into FreeBSD and press Enter.
16. Installation of the packages will take some time … more coffee, anyone?
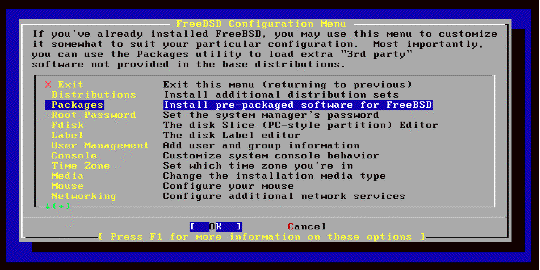
17. Once the package installation is complete, you will return to the following screen:

18. You should now change the root password to any password you desire – do this by selecting “Root Password” and pressing Enter. You will be then asked for the password twice, and will be returned to this screen once done.
19. Skip to the last option: Networking. Select it and press Enter. You will reaching the following screen:
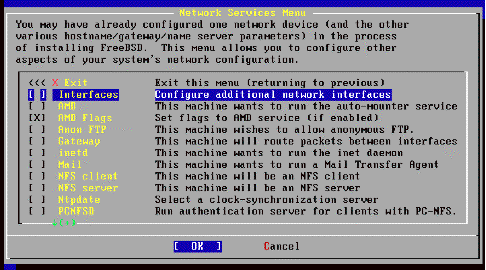
20. We’re trying to configure our network card so we can get files into and move files out of the installation of FreeBSD. Select Interfaces above and press Enter. Select “lnc1” as the Ethernet adapter next, press Enter. Then select Yes on the next two screens and press Enter on both aswell.
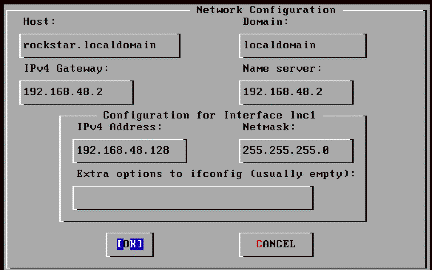
21. You will reach the screen shown below. Select a hostname (I typed in “rockstar”) and press Tab till you reach “OK” at the bottom. Press Enter.
22. Return to the FreeBSD Configuration Menu by selecting Exit and pressing Enter.
23. Now you’re all set – press Tab to select Cancel. Press Enter. On the screen you see next (“Choose Customer Installation Options”) select “Commit” and press Enter. Once done, select Exit on this menu aswell and press Enter. Press Tab on the next screen and Exit Install. You will be prompted to answer whether you want to reboot the machine or not. Select Yes and press Enter.
24. The system is now restarting.
25. You will soon reach the login prompt for your new FreeBSD installation. To login enter the username “root” and the password “X” where X is the password you selected during the installation.
26. Welcome to FreeBSD 5.4.