Figure 1. Initial window from wireshark
Due: May 26, 2021
Points: 100
This laboratory exercise has you use a packet sniffing tool called wireshark to see the differences between a web session that uses TLS and one that does not. To do this, you need to install wireshark, which can be downloaded from https://www.wireshark.org.
When you start wireshark, it brings up a list of interfaces. Choose the one that is appropriate for your system; how you do this depends on what your system is and which interface it uses for the network. For example, on a Mac connected to the network by an ethernet cable, the interface is probably “en0”. For wireless, look for the Wi-Fi interface.
When wireshark starts, the window looks like what is in Figure 1:
Figure 1. Initial window from wireshark
For our purposes, the important parts are the following:
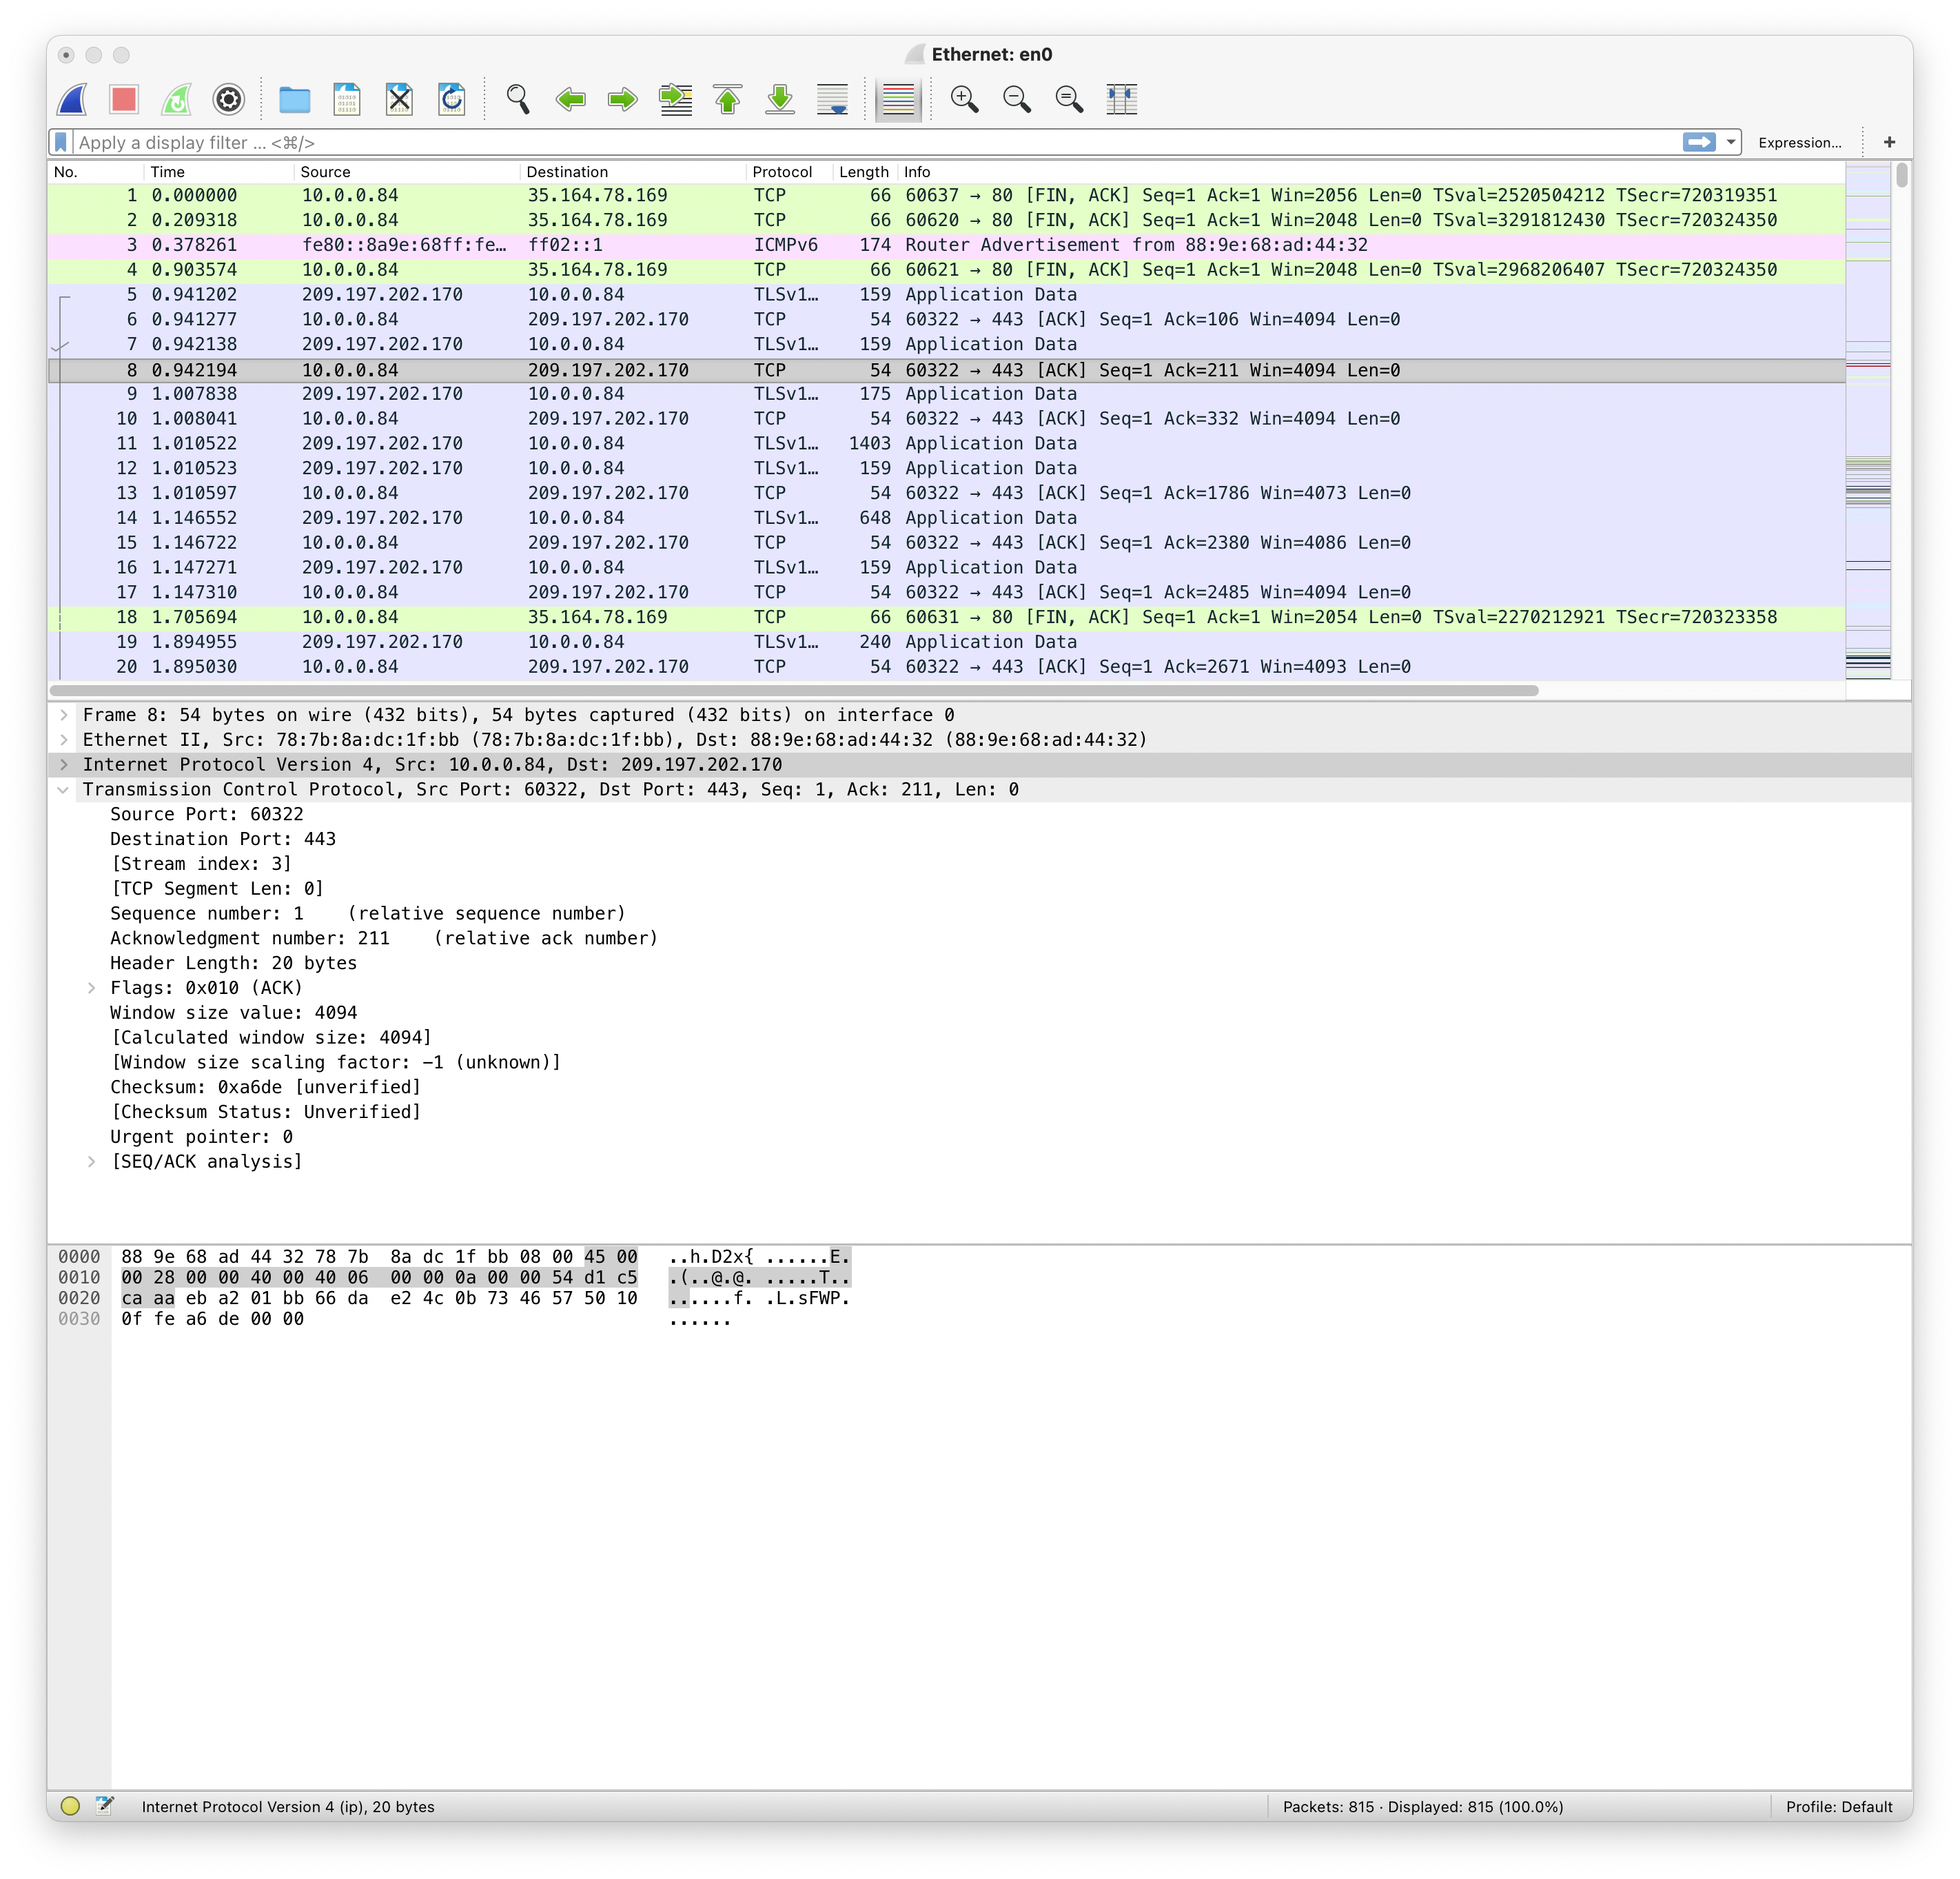
Figure 2. Expansion of TCP part of packet 8
Now look at Figure 2. This is the same window but with packet 8’s TCP layer expanded. The origin and destination can be read either from the wireshark list of packets, or from the Internet Protocol line (which can itself be expanded by clicking on the > to the left of it).
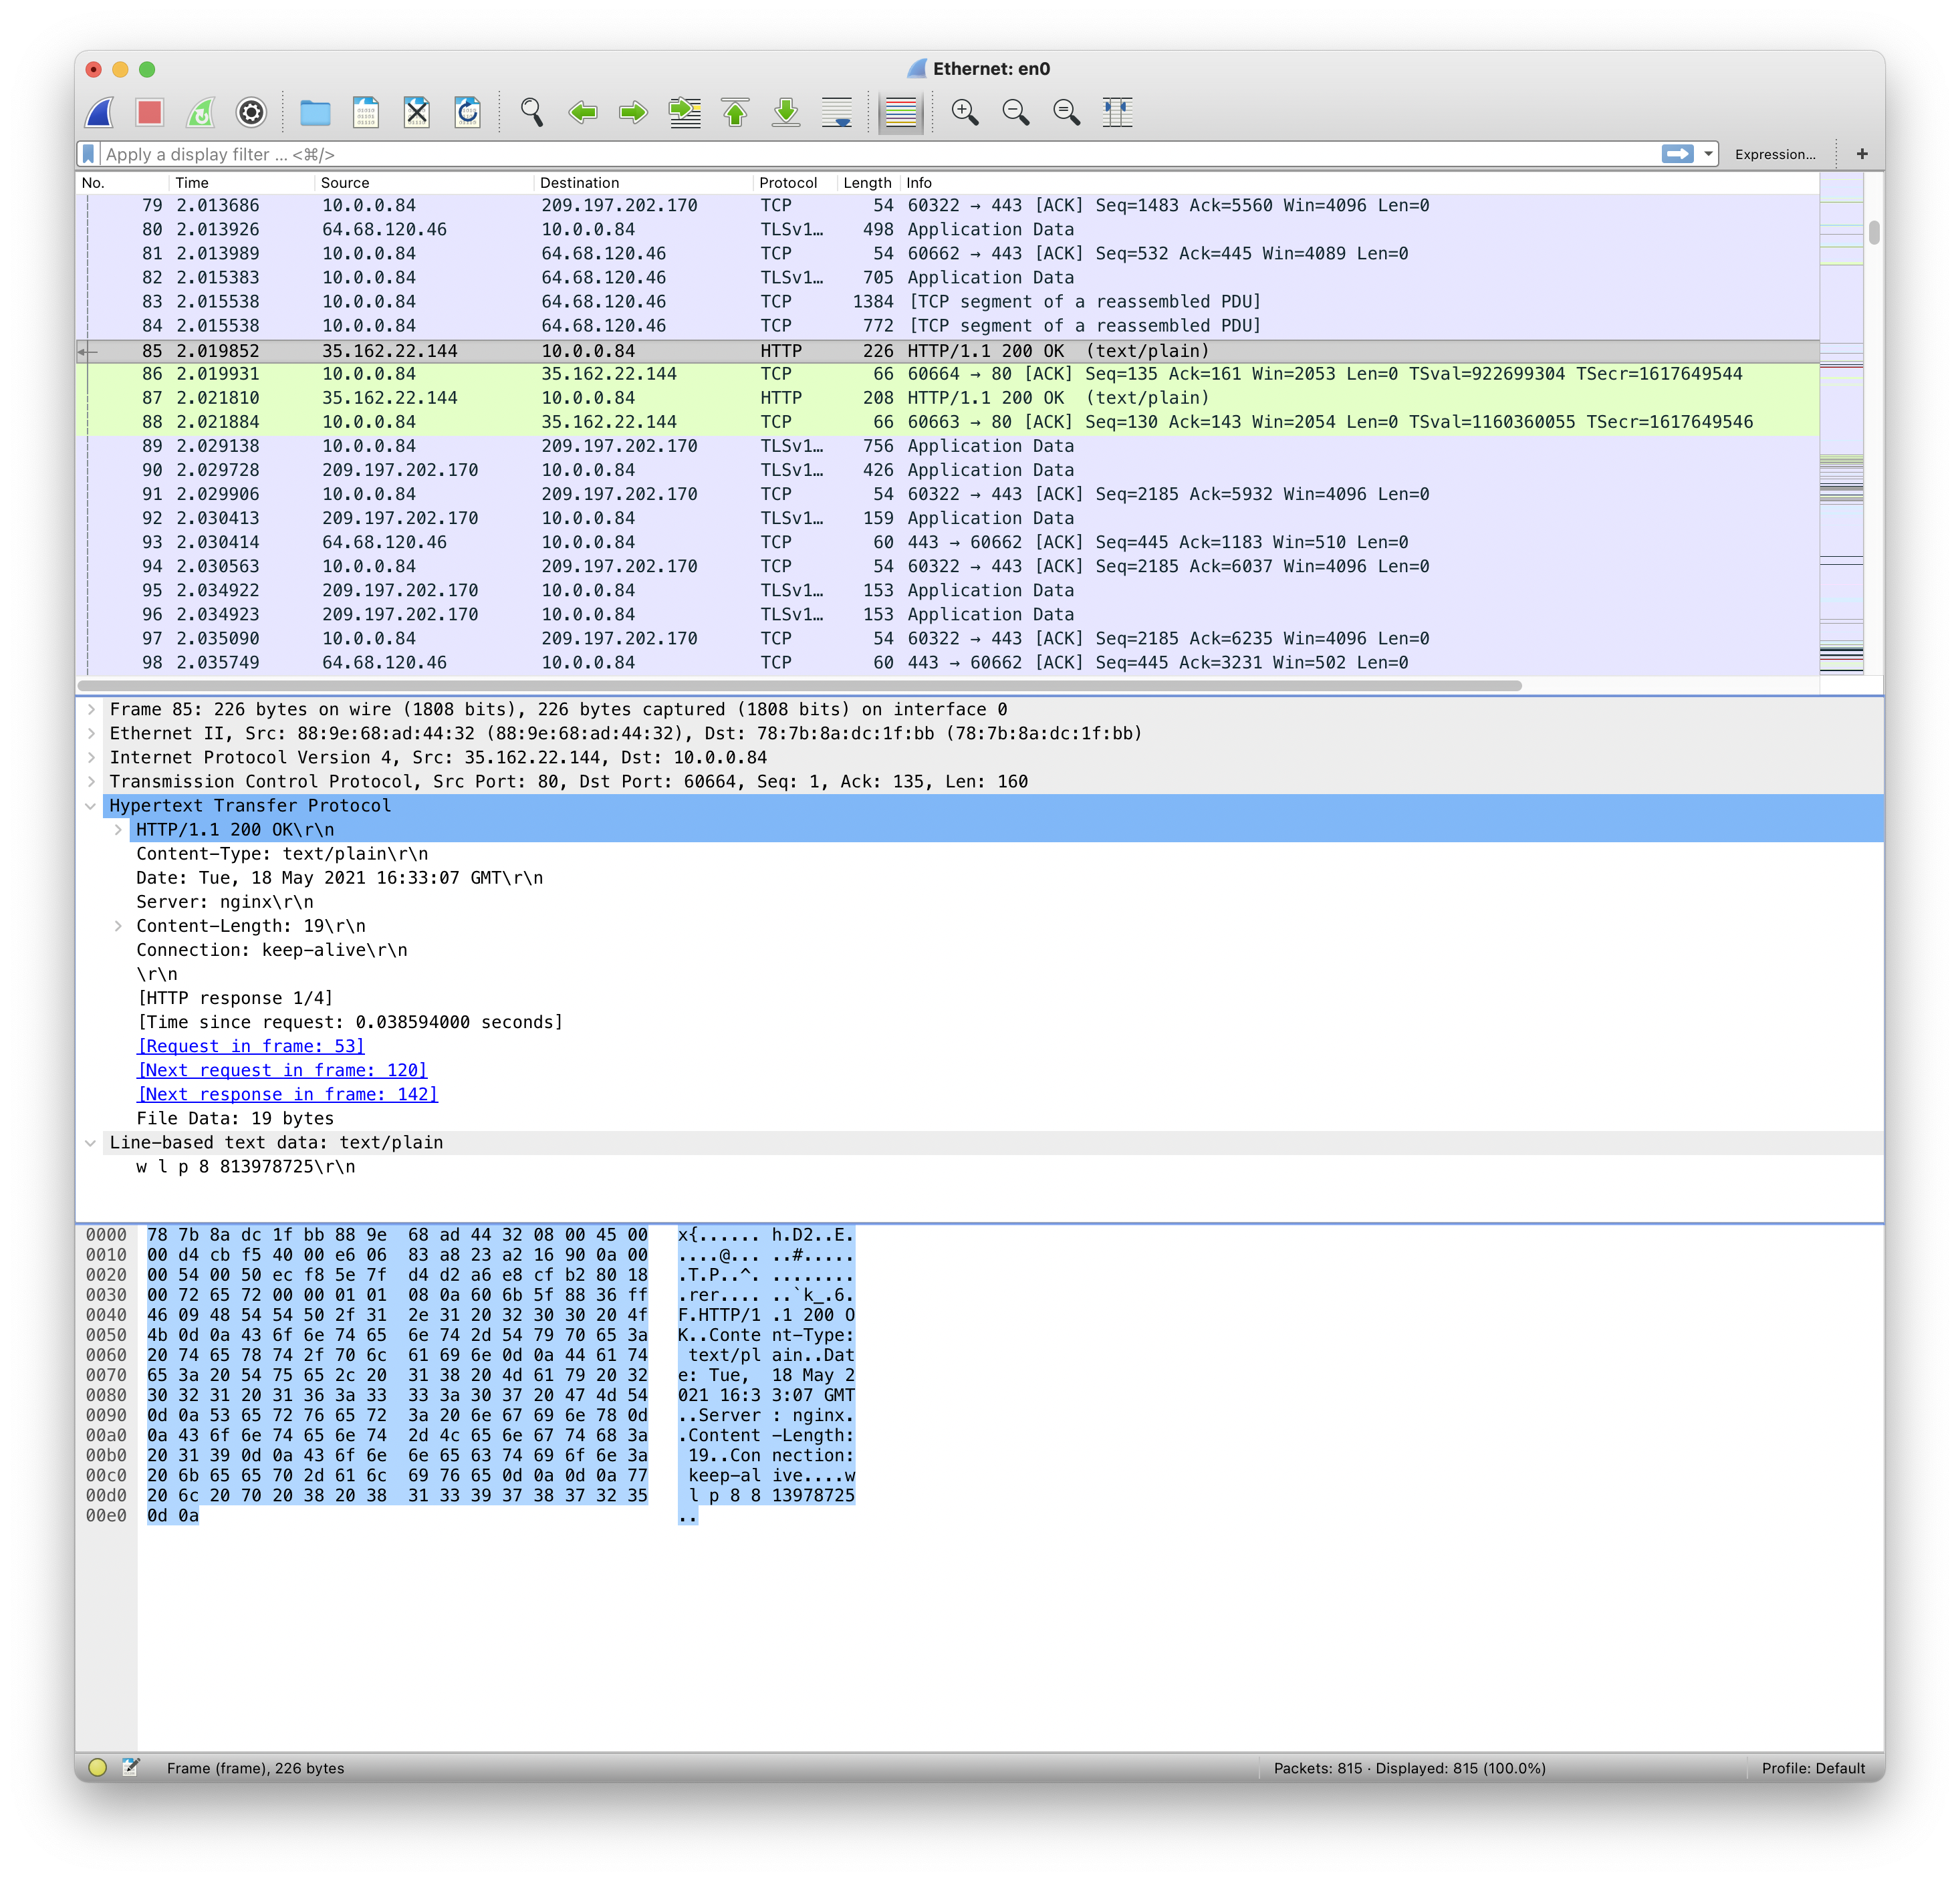
Figure 3. Expansion of HTTP part of packet 85
Figure 3 shows an application layer protocol, HTTP, on top of the TCP protocol. In this figure, it is expanded. Notice the name of the server there, “nginx” followed by a carriage return (\r) and line feed (\n). Now look in the window below, at the character representation of the packet. Byte 0x92 begins the same line, “Server nginx” (the carriage return and newline are non-printing, so the two “.”s following the string are them. The important point is you can read the text in the packet directly. Indeed, wireshark simply does so and extracts information to construct the representation of the Hypertext Transfer Protocol.
Figure 4 shows the expansion of packet 9. It is similar to that of packet 8 (see Figure 2), except that below the Transmission Control Protocol line is a Secure Sockets Layer line. If you click on the > for that, another line, the TLSv1.2 Record Layer, will appear. Click on the > for that, and you see information about the packet.
If you want to see the bytes that correspond to the fields, click on the field. The corresponding bytes (and characters) in the packet will be highlighted in the packet body. Figure 4 shows this. The version is selected, and you can see the dark highlighting in the packet body. The light highlighting corresponds to the secure socket layer part of the packet.
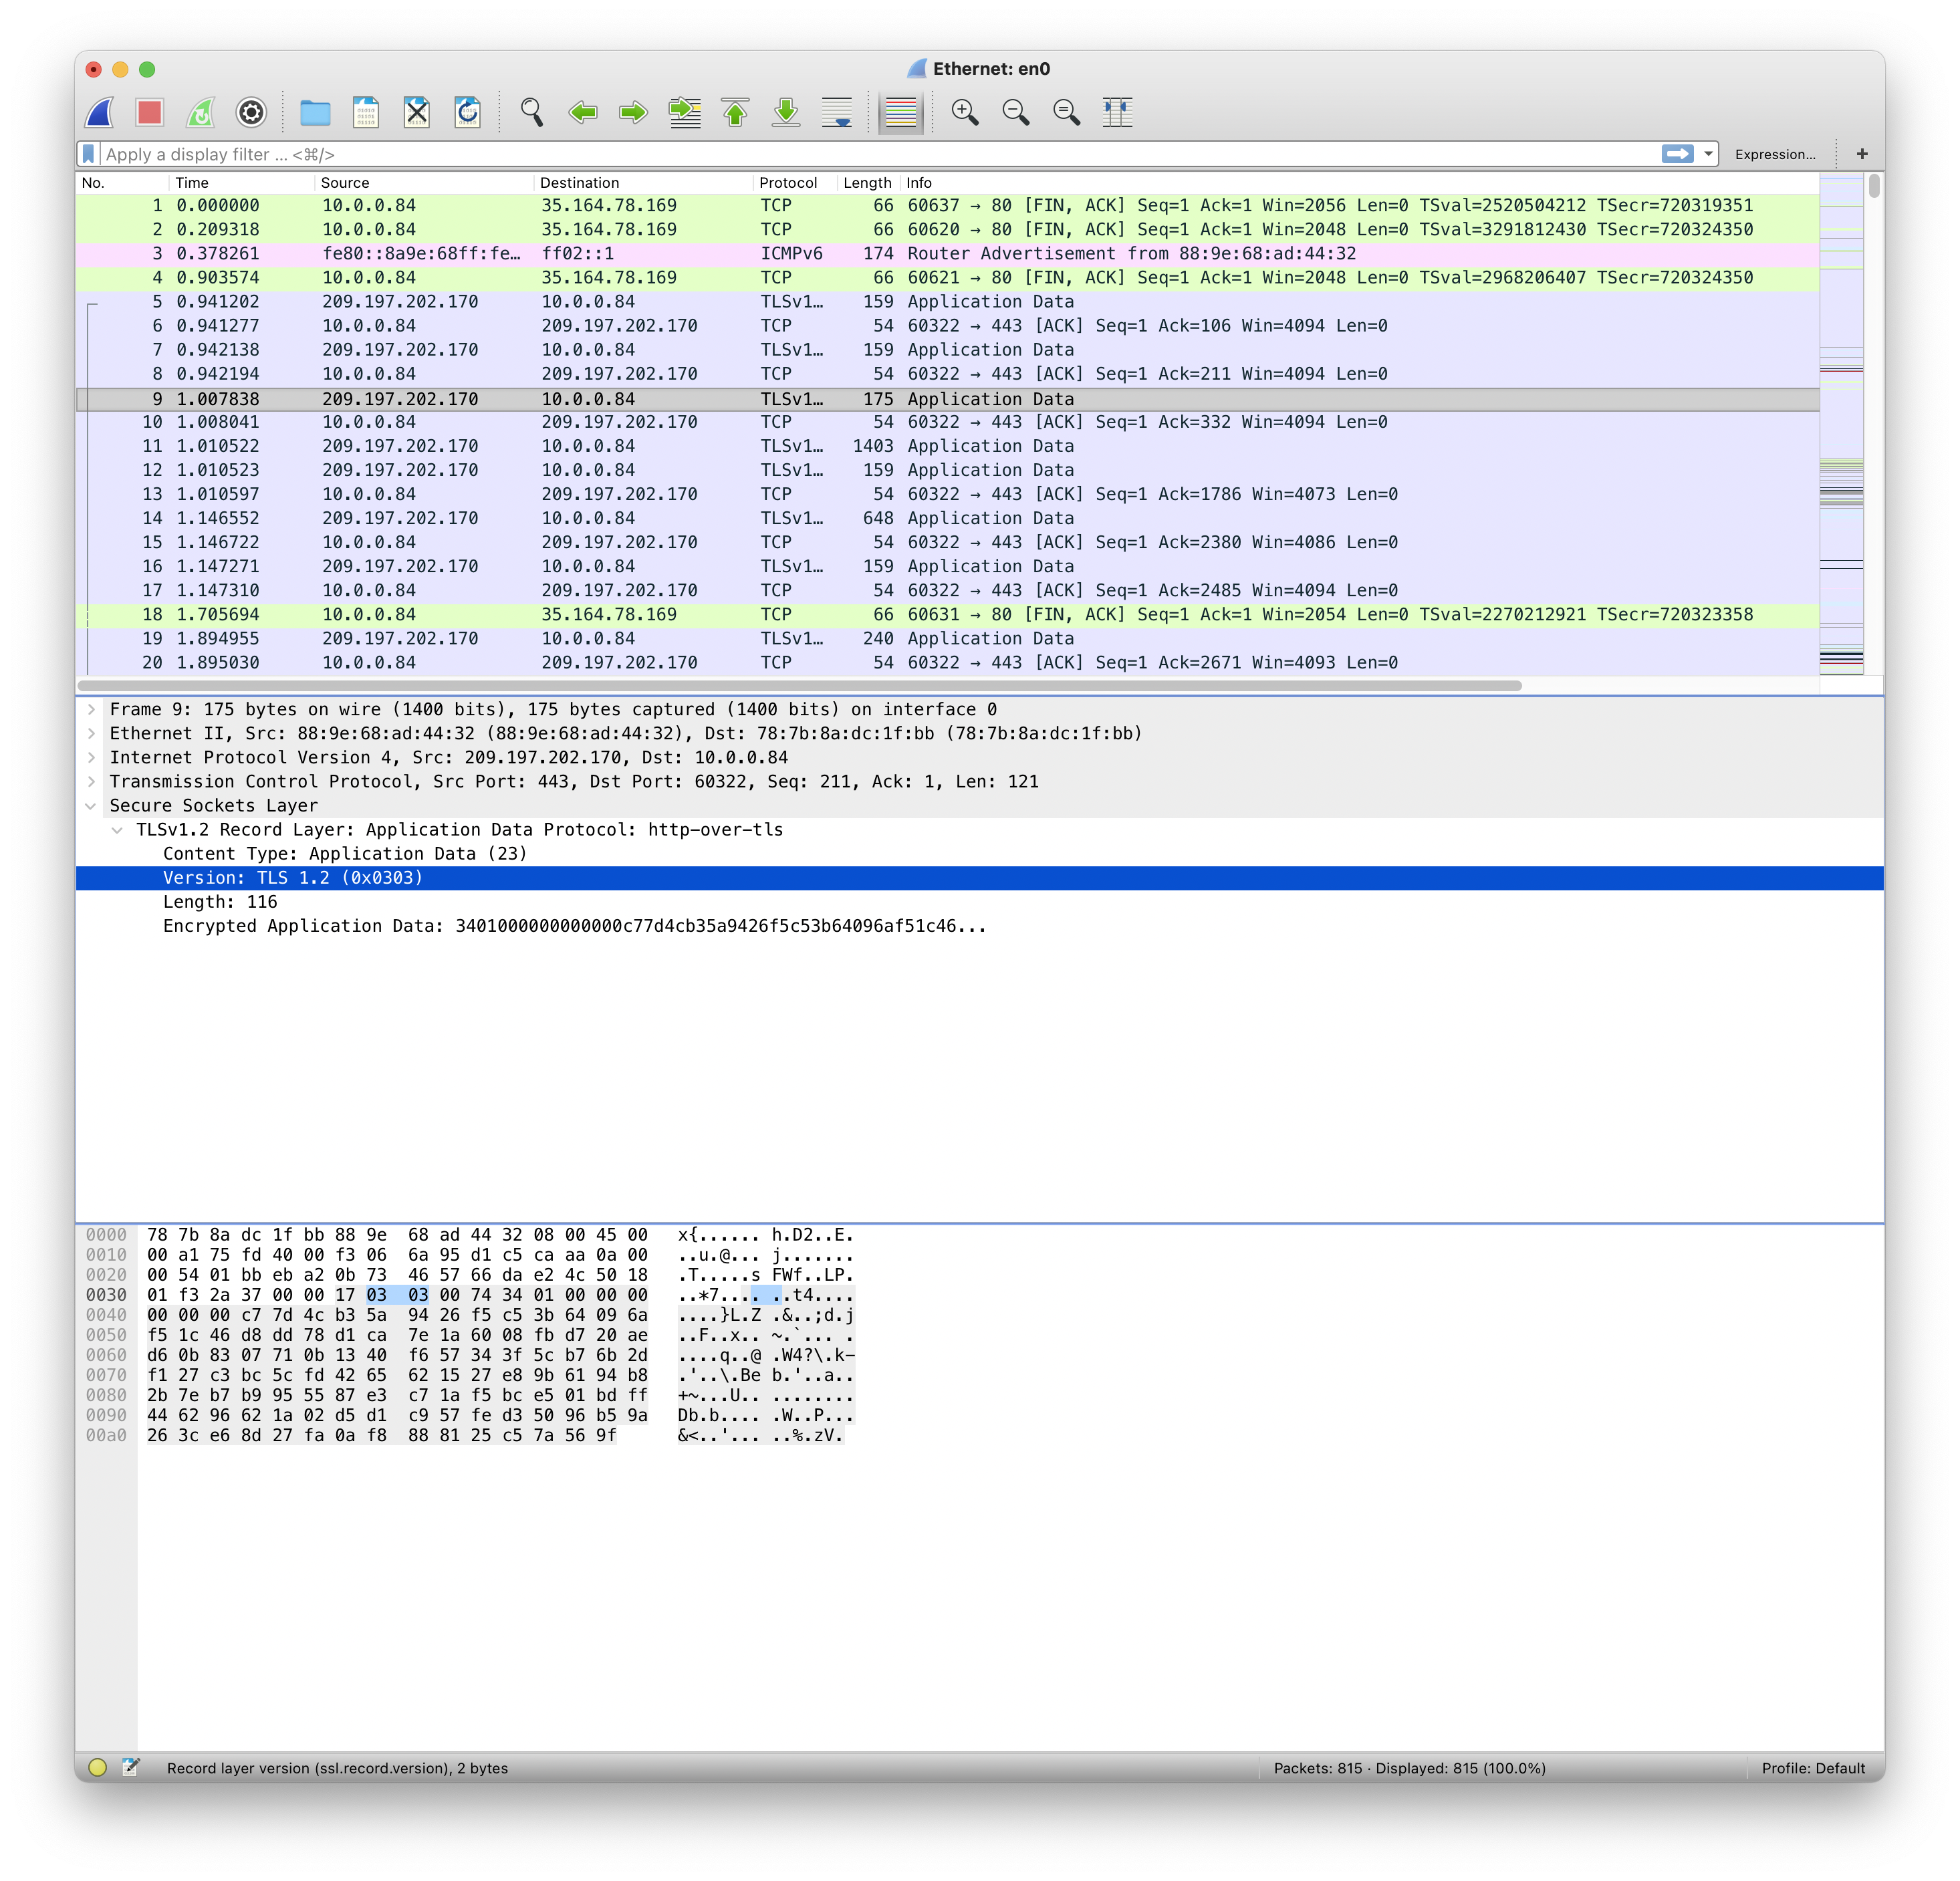
Figure 4. Expansion of TLS part of packet 9
The encrypted data begins at position 0x3b in the packet body (look at the lowest window). Notice you can’t read any words; this is because it is encrypted. That’s the difference between HTTP and HTTPS (which is HTTP over TLS).
Given all this, we’re ready to go ahead with the lab.
First, open wireshark and select the network interface. Next, open your web browser (if it is already open, close it) and go to https://www.cnn.com. Notice the look next to the URL; this says the connection is secured using TLS. Let’s look for the packers related to the connection. To do this, we filter the packets:
where a.b.c.d is the IP address of your system (be sure to hit return or enter after typing the above; the bar should turn green). If you are behind a NAT, use the address of your system, not the one exposed to the outside word. This eliminates any packets not going to, or coming from, your system.
You can click the big red button now to stop wireshark from getting packets. You don’t have to, but it may make reading things easier.
Now let’s look for the connection to www.cnn.com. Add “&&tls” to the filter, again pressing return or enter. The Protocol column should have lines beginning with “TLS” only. Look down the packet list until you see "Client Hello" in the info field. This is the start of a TLS connection.
Now look for "Client Hello" in the Info field. Search for it by clicking on the magnifying glass to the upper left; it is probably next to a green arrow). Then between the "Case Sensitive" checkbox (leave this unchecked) and the search window is a drop-down menu. Chang it to "String" and type "Client Hello" in the search box, and click Find.
In the bottom window, look for "www.cnn.com". This will be in the rightmost two columns, and may well be split over them (the columns read across). If you see another host name there, click Find again, and repeat until you see the www.cnn.com You may have to click through several packets before finding it (I found it on the 20th click).
Now get the destination address from this packet; call it w.x.y.z. That’s the address for www.cnn.com. Do not use a DNS lookup to get the IP address. You will get several, and there is no guarantee this one will be among them. Add that address to the filter as “&&ip.addr==w.x.y.z” and press return. Now you will see all the packets exchanged between your system and www.cnn.com.
Let’s see what ciphers your browser recognizes. Go to the middle window and click on the > sign next to Transport Layer Security. Click on the > sign next to the Record Layer line that appears below it, and then on the > sign next to the Handshake Protocol. That contains the information from the handshake protocol such as the ciphers the client can speak.
Please answer the following questions, and include a screen shot showing how you got your answers:
1a. What are the source and destination IP addresses?
1b. What is the source port on the client (your system), and the destination port on the peer (the server)?
1c. How many ciphers will the client accept?
1d. How many compression methods will the client accept?
Now answer these about the server. The information will be in the Server Hello packet. Again, include a screen shot showing how you got your answers
2a. What are the source and destination IP addresses of the Server Hello packet?
2b. What is the source port on the peer (the server), and the destination port on the client (your system)?
2c. Which cipher does the server select?
2d. Which compression method does the server select?
Next, go to the Certificate packet. Please answer these questions and include a screen shot showing how you got your answer.
3a. How many certificates are present?
3b. Are these going from the client to the server or the server to the client? How do you know?
3c. Look at the first certificate. What algorithm is being used? What subject was the signed certificate issued to?
Now let’s see what the key exchange algorithm is. Look at the Server Key Exchange packet. Please answer this question and include a screen shot showing how you got your answer.
4. What cryptographic handshake algorithm is being used? You need not give the parameters.
Look at the Change Cipher Spec packet. Please answer this question and include a screen shot showing how you got your answer.
5. What is the length of this message (not the packet, the Change Cipher Spec message)?
Finally, look at the first Application Data packet. Please answer this question and include a screen shot showing how you got your answer.
6a. What is the Content Type of this packet?
6b. Can you read any of the application-level data?
Now restart wireshark so it will gather packets. Close your web browser and reopen it. Go to the host http://nob.cs.ucdavis.edu, IP address 169.237.6.105.
7a. What is the filter to display only the packets between your host and nob.cs.ucdavis.edu?
7b. What is the filter to display only the HTTP ones?
One of the packets says “404 Not Found”. Please answer this question and include a screen shot showing how you got your answer.
8. What file was not found?
Locate the packet number (far left column). Change the filter to display TCP packets. Now, look at the packets preceding the “not found” one. Please answer this question and include a screen shot showing how you got your answer.
9. One of the packets contains the name of the web server program (like apache or nginx) on nob.cs.ucdavis.edu. What is it?
|
ECS 135, Computer Security Version of May 25, 2021 at 6:54AM
|
You can also obtain a PDF version of this.
|